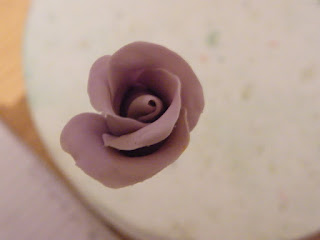
The following is my method for making a Gumpaste rose using the 5 Petal Cutter.

Products you will need to create a Wired Gumpaste Rose
5 Petal Cutter (for the rose pictured in this tutorial I have used the largest cutter from the PME FP900 Set).
18 Guauge Florist Wire
A Ball Tool. I have the Wilton 10pc Fondant / Gumpaste Tool set
A Pair of wire cutters
A Pair of round nose pliers
Cornflour for Dusting your board (I tie mine up in a Muslin Cloth with a rubberband so I can pat on my board as needed.
A Cake Dummy or block of foam to hold your flowers while you work.
Kitchen Towels
Cocktail Sticks
I also recommend:
Here is a picture of my table ready to start making Roses :)
To start with your pliers make a loop in an 18 Gauge Wire then bend the loop up.
Make a cone small enough to fit inside the petal of your 5 petal cutter.

Press the looped wire into your cone and use a toothpick to smooth closed the opening where the wire has been inserted. Let dry completely.


Dust your board and the top of your paste with cornflour. I used a muslin cloth to make a dusting bag. Roll out your paste and cut one shape.


Use the ball tool to soften and slightly ruffle the edges of your petals.


Using edible glue glue the first petal and thread on the wire. Bring Petal up and fold to cover the Cone. Make sure to cover the cone, you should not be able to see it once the first petal is attached.


For the second petal glue half way up, do not cover the whole petal in glue. Bring the petals up one at a time alternating every other petal tucking each into the petal before.


Use a cocktail stick to curl the tips of the petals and to slightly open up your bud. You should be able to see down into the petals.


Use a cocktail stick to roll the excess paste off the base of your rose bud and remove the excess paste. Now you have a rose bud. You can complete the bud by adding a calyx or move on to the next step to create a full rose.


Cut a second 5 Petal shape and soften/ ruffle the edges as before.

Turn over and use ball tool to cup the petals

Turn back over and use a cocktail stick to roll the tips of the petals into a V shape.


Thread onto the wire and bring petals up one at a time alternating every other petal as before. Glue only the bottom of the petal in a V shape. Open up the petals and shape with cocktail stick more if necessary. The petals should not be too tight, you should be able to see down into your rose.

Cut a third shape with your 5 petal cutter. Soften edges and curl petals as before. Thread onto wire. This time no need to alternate petals. Bring them up one after the other. Glue only the very bottom of the petal in a V shape. Open out and curl with cocktail stick if necessary.


For the Calyx I’ve used the largest of the PME CA896 Set. Cut out and soften the edges with your ball tool.


Use your veining tool to add the vein in your Calyx. Use a pair of fine scissors to snip the leaves for a more realistic touch.


Make a small ball of paste and thread onto your wire.


Place the calyx over a hole in your Mexican Hat pad. I used the second largest hole in mine. And thread your wire through the calxy / pad


Pull the flower down onto the pad then remove and shape /glue calyx petals into place.


You now have a rose

I used shades of Pink and Violet Dusting Powders to colour my rose and bring it to life.

Add some rose leaves for an extra touch. I did two stems of three leafs and one stem of five leaves for my final project.

Rose leaves wire up.

A Pretty Spray of Wired Roses.

Below is a video demonstration of me making a rose. I cheated a little for the purpose of the video. There is a technique you can use if your in a hurry and don't have time to wait for the cone to dry completely before starting your rose. You can heat the wire until it is red hot and insert into the cone and this will hold the cone in place without having to wait for it to dry. Please take care not to burn yourself if you decide to try this!


No comments:
Post a Comment